Struggling with the problem solving involved in HSC Physics Module 5: Advanced Mechanics? Let us walk you through it!
In this guide we’ll dive into strategies you can use as problem solving tools for Advanced Mechanics.
The workshop of Module 5: Advanced Mechanics will expect you to already know how to use a bunch of the machines in there (and to already basically speak the language of mechanics).
In fact, there’s not a whole lot of new ideas in Module 5!
A small committee of hard truths tie the whole thing together, and you’ve already met most of them, such as these big players:
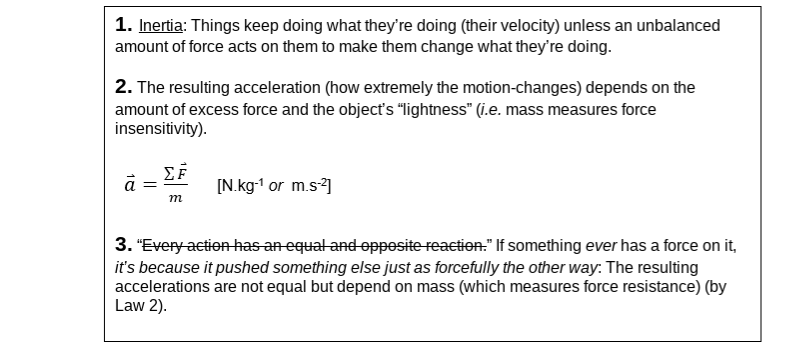
- Newton’s (three) Laws of motion
- Conservation of Energy
However, you’ll be learning some more complex scenarios, such as:
- Gravitational falling and;
- Motion circularly
Excited? This is the machinery of the world! You should be! Let’s get started!
What can I expect from the rest of HSC Physics in general?
Topic 1: Projectile Motion
Topic 2: Circular Motion
Topic 3: Gravitation
How to Study for HSC Physics Module 5: Advanced Mechanics
What can I expect from the rest of HSC Physics in general?
The major shift: in-depth focus on core/pillar concepts that sit underneath and drive phenomena subject-wide.
Physics update!
As things stand right now, there are two theories in Physics (General Relativity and Quantum Mechanics) out of which all the behaviours of the universe naturally arise.
The ultimate end goal of Physics is to figure out what these two theories click into – the Grand Unified Theory (GUT).
So, physics is made for this “depth” treatment (or… the Universe is?).
The history of physics is literally a story of geniuses uncovering the same hidden engine at the end of each road they arduously hauled their brains down.
So, you’ll get a much more powerful understanding of physics to carry forwards, but the course demands you to really own your learning like never before!
Overview of Topics in HSC Physics Module 5: Advanced Mechanics
The sequel to Year 11’s mechanics comes in a trilogy:
- Projectile Motion
- Circular Motion
- Gravitation
So, let’s get into it!
Topic 1: Projectile Motion

Image from RVA Mag
This is none other than the kinematics of falling things in disguise.
Remember to bring your mad vector-addition skills, because projectiles usually go sideways over the ground while they’re doing all that falling down.
Topic 2: Circular Motion

Newton says if something isn’t feeling any excess pushes, it gets to keep doing its straight-line (or stand-still) motion as-is. (i.e. it gets to hold on to its exact velocity, whatever it is).
But spinny things are at all times being yanked away from any possible straight-line paths they could take, which all perpetually lie outside the circle.
This is why you feel compelled towards some location outside the window when your car rounds a corner too quickly. (It’s where your inertia would have taken you had you not been yanked away from it forcefully).
What’s this force that can stick an object’s motion on to a circle and hold it there? What pulls cars around part of a circle when they round corners? Why do cars on icy roads prefer to revert back to straight-line motion against our wishes, if we go to fast?
Again, bring your vector skills because it’s all roller coaster loops, jets pulling out of dives, merry-go-rounds and cars sticking-to/slipping-off road curvatures – there’ll be vectors all over the workshop floor.
Tip: If you’ve ever seen a solar system animation/model (quite spinny), or a motor spinning, you’ll intuit that this circular stuff is about to become a big deal in your physics journey.
Topic 3: Gravitation

It’s circular motion… in Space.
You’ll look briefly at what’s pulling all the masses out of straight lines (gravity fields) and then it’s all circular motion of planetary orbits, coloured in by the energy of the g-field.
How to Study for HSC Physics Module 5: Advanced Mechanics
Step 1: Make sure the foundations are solid
There’s a handful of year 11 central ideas you need to bring with you. Year 12 assumes you’ve got them.
Here are the main ones:
Newton’s Law Package:
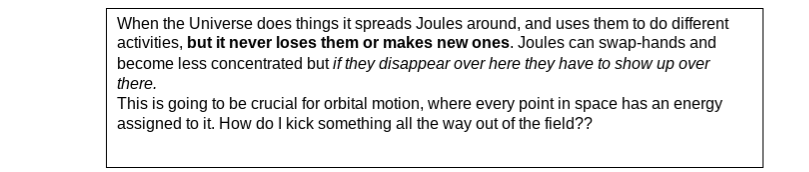
Energy Conservation:
You’ll also need to know vector addition, and all of the motion equations from kinematics.
This stuff was all groundwork. I’m not kidding – revisit it and bring it all back to the front of your head.
It’s quick to learn things the second time around, so this is efficient study time.
Re-do your year 11 kinematics and dynamics tests to iron out the sticking points.
Go over some vector addition problems from your year 11 textbook’s chapter review (as well as linearly accelerated motion).
Make sure you feel confident with these topics, because they’re the groundwork for the Year 12 course!
Step 2: Develop your problem solving skills
Thinking is very important in Physics. Physics problems beg you to interpret and analyse a wide array of specific real situations on a case-by-case basis and apply mental tools to dig out a solution. Sometimes, it takes some trickery.
But, like anything, there’s absolutely an art to this which can be learned. You’ll want to familiarise yourself with the answer-winning procedures and techniques.
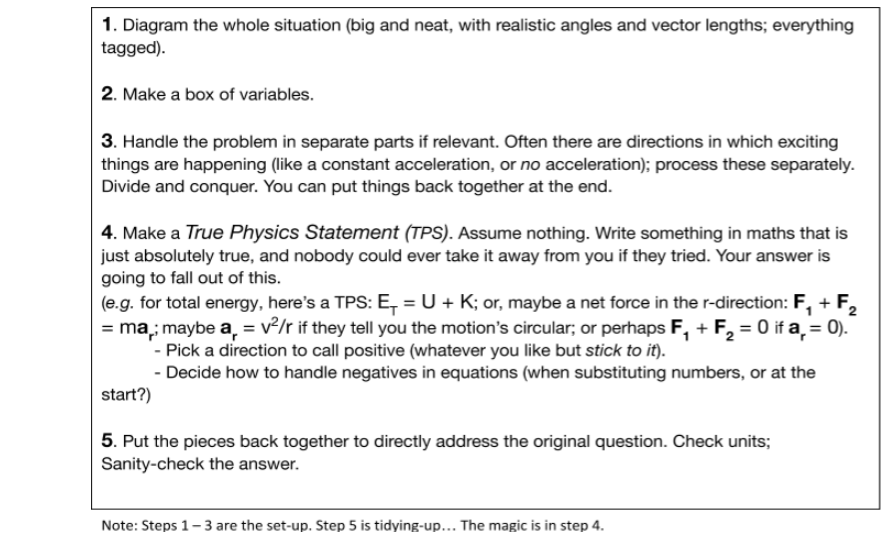
General Problem Solving Script:
Here’s an example set-up for a circular motion problem asking about someone swinging from a rope.
Note: The True Physics Statement is just Newton’s 2nd Law from Year 11!
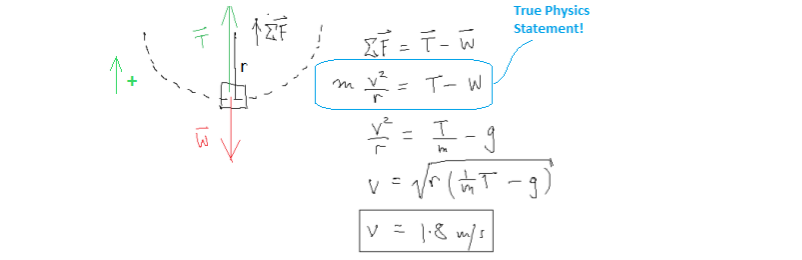
Also note: Declaring a positive direction, handling negatives straight away, neatness and sensible vector lengths.
Students often trip over questions like the above because they skip Step 4 (the “make a 100 % undeniably true physics statement” step) and defer to assuming something tempting about the forces that seems right at a glance.
Make a True Physics Statement!
Step 3: Stick to the script
Make the above prescription (in step 2) into your problem solving etiquette. No matter how simple a problem seems, stick to the script!
Some things in Physics are not intuitive at all when the human brain looks at them (and some things are).
Even for the simplest of problems, start diagramming!
Figure out exactly what your True Physics Statement is going to be.
Get into the habit of having a process of how you like to babysit the negative signs in your equations. Make it your procedure or your problem-crunching/answer-extracting algorithm.
It’s smart practice to diagram even seemingly simply problems out in full.
You’re going to be be amazed at how many “seems obviously true, but is in fact completely wrong” answers are lurking in the shadows of your problem solving.
Plus, if your process is disciplined like this when you’re answering the Band 6-separator questions at the back of the HSC paper which are designed to trip up almost everyone else, it can be game-changing!
Step 4: Become as experienced of a problem-solver as you possibly can
Sometimes, you just simply would not know how to proceed unless you’d seen the trick performed before (by reading someone else’s solution).
It’s not a question of smarts – there’s often some trick that’s not obvious, but about who’s got the most experienced physics problem-solving hand.
Highly intelligent medical students are sometimes bewildered when they watch veteran doctors diagnose seemingly impossibly complicated cases almost just by glancing at them from across the room briefly (before confirming it).
Sometimes you’ll feel the same when watching a teacher solve a high-end physics problem (and, then, at the end of the year, *you’ll* have that experience).
Churn through as many practice problems as you can get your hands on. Become more of a veteran than your peers!
Every problem you get wrong is a huge +1 to your experience as a physics problem-solver. Get as many problems wrong as you possibly can now – get experienced.
Grab some more practice problems here and here (especially chapter 6) if you exhaust your textbook’s ones!
Step 5: Study smart
Pssst, From Day 1 of circular motion, you should be able to almost hear yourself winning half the course’s future marks…
After Circular Motion the next two big areas are orbital mechanics (*actually circular motion*) and, in the next module, the motor effect (*actually circular motion*….).
Circular motion is a key that continues to open doors as you progress towards the end.
This is one key you definitely want to know how to use!
Your effort in circular mechanics keeps paying you back in marks, so don’t stop until you’re confident you’ve nailed the concept.
That wraps up our breakdown and study tips for HSC Physics Module 5: Advanced Mechanics! Happy studying!
You can also check out our other HSC Physics guides below:
- HSC Physics Module 6: Electromagnetism Guide
- HSC Physics Module 7: The Nature of Light Guide
- HSC Physics Module 8: From the Universe to the Atom Guide
Looking for some extra help with HSC Physics?
We pride ourselves on our inspirational HSC Physics coaches and mentors!
We offer tutoring and mentoring for Years K-12 in a variety of subjects, with personalised lessons conducted one-on-one in your home or at our state of the art campus in Hornsby!
To find out more and get started with an inspirational tutor and mentor get in touch today!
Give us a ring on 1300 267 888, email us at [email protected] or check us out on Facebook!